Overview of Fisheye and Cylindrical Panoramas
If you are a professional photographer or a photography enthusiast, there are high chances that you have tried your hand at fish eye panoramas / fisheye panoramas or 360 degree panoramas. In case you are a novice photographer trying to learn the tricks of the trade, or an experienced photographer who wants to polish his/her panoramas clicking skills, following article on panoramic digital photography is just apt for you.
Cylindrical & Fisheye Panorama - In Brief


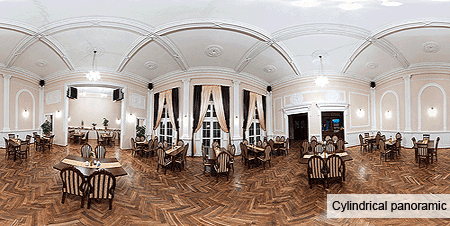
Cylindrical panoramic is an image that is meant to be viewed as if seen through the inside of a cylinder. You can look at the image horizontally at a 360 degree. Cylindrical panoramic images are mostly used for shooting wide open exteriors or interiors where the floor and ceiling are of no significant interest.
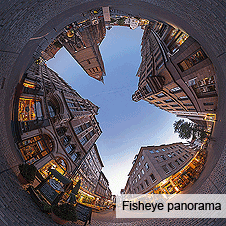
Fisheye panorama is a wide angled shot that enables the coverage of a wide surface using a few images. Fisheye panoramas are extremely useful for creating panoramic views of virtual tours. Fisheye panoramas are easy to create and also the cost is less when compared to other types of panoramas.
What is the Difference Between Cylindrical and Spherical Panoramas?
By using cylindrical panoramas you can effortlessly capture any area in all directions. Cylindrical panoramas cover an entire 360 degree, except for the up and down view. Spherical panoramas on the other hand not only capture the 360 degree view, but also take into account the up and down view. Spherical panoramas are the best of the lot, as they can be taken without the tripod being seen or the photographer's shadow.
There are several advantages of shooting 360° spherical panoramas. 360° cylindrical panoramas are ideal for shooting panoramas of wide open areas and can be easily printed. The viewer can also get an overall sense of the place, as 360° spherical panoramas focus on the most significant aspects of the place.
How to Shoot Panoramic?
If you want some advice on 'how to panoramic photography' or 'how to shoot panoramic', here are some simple guidelines that you can follow:
What all you need?
To create 360° cylindrical panoramas, you will need a camera, fisheye lens, a tripod and a panoramic head. By using a fisheye 10.5 mm lens, you will only need to take 8 photographs. Before you shoot the fisheye image, you must set the entrance pupil of the camera and mount your lens on the panoramic head.
How to go ahead?
To begin with, choose an ideal spot from where you want to shoot the fisheye panorama. Next, start clicking photographs around yourself, until you have entirely covered the intended field of view with photographs. You can use any camera or lens for taking a 360 degree panorama, but just make sure that your photographs overlap each other. However, using a digital SLR camera, along with a fisheye lens will give you better panoramas. The wider the viewing angle of your lens is, the lesser number of photographs you will need to capture. Using a fisheye lens makes it easier, as you will only need less than 5-8 images to cover an entire sphere.
Useful Panoramic Photography Tips
Here are some useful panoramic photography tips that you can use while shooting 360° cylindrical panorama -
- Use the panorama or stitch mode on your camera
- Try using a panoramic head, as this will help you take your photographs from the exact same point. This can help you avoid parallax errors while stitching your panorama. Nodal Ninja panoramic heads is one the best in the industry
- Remember to overlap your photographs by 15% to 30% to avoid flaring. This way, your panorama can be put together with no missing pieces
- Shoot your photographs in the RAW format as this ensures maximum quality
- Keep your camera on the same level by using a tripod
- Set the metering mode on your camera to manual
- Check the scene for movement ( people, cars etc.) before you click your photos
- Don't forget to take vertical shots of the scene as they can add to the overall panorama effect
- Adjust your camera to full manual mode ( manual focus, manual white balance and manual exposure)
- Capture all your photographs on a horizontal line. This will give your fisheye panorama neat edges
- If you are not sure about a shot, then taken another one in order to get the best images for your panorama
- Avoid unexpected changes to come into the scene by shooting for the entire panorama in the shortest possible time
How to Create 360° Panorama?
After you have finished shooting your images, the next step is to create a 360 degree panorama by using an image stitching software. Before you put your photographs together, do remember to process them by using a photo editing tool. Once this is done, you can stitch your photographs together by using a software tool like PTGui, Panotour or Hugin. However, image stitching is not a lightweight task and does require skill, time and effort. If you are not keen about image stitching, you can always opt to outsource it to professional companies like outsource2india.
Try Your Hand at Fisheye and Cylindrical Panoramas!
Now that you know all about shooting and creating 360° spherical panorama, why not go ahead and start shooting a 360° cylindrical panorama right away. Do let us know about your panoramic digital photography escapades. We, at Outsource2india would love hearing from you!
Verticals / Industries We Cater to
Outsource2india has the expertise to work with clients from different backgrounds and verticals. Some of the verticals we cater to include:
 Online Apparels Shopping
 Online Electronic Store
 Online Automobile Store
 Online Sports Accessories
 Publishing
 Houses
 Portrait
 Studios
 Real Estate Companies
In case you need help with stitching your 360° spherical panorama, get in touch with our experts today.
Get a FREE QUOTE!
Decide in 24 hours whether outsourcing will work for you.
Have specific requirements? Email us at: ![]()


